S08-05 Node-Express
[TOC]
基础用法
认识 Express
HTTP 内置模块的缺点:
前面我们已经学习了使用 http 内置模块来搭建 Web 服务器,为什么还要使用框架?
使用复杂:
原生 http 在进行很多处理时,会较为复杂。有 URL 判断、Method 判断、参数处理、逻辑代码处理等,都需要我们自己来处理和封装。
内容混乱:
所有的内容都放在一起,会非常的混乱。
Web 应用开发框架:
目前在 Node 中比较流行的 Web 服务器框架是 express、koa。
我们先来学习 express,后面再学习 koa,并且对他们进行对比;
Express:是基于 Node.js 平台的一款轻量级、灵活且功能强大的 Web 应用开发框架。它简化了 Node.js 原生 HTTP 模块的开发流程,通过提供路由、中间件、请求 / 响应处理等核心功能,帮助开发者快速构建 Web 应用、API 接口或后端服务。
安装
Express 的安装方式:
- 方式一:
express-generator脚手架安装 - 方式二:从零搭建
脚手架安装
方式一:express-generator 脚手架安装
依赖安装:
express-generator:用于快速生成 Express 项目的脚手架工具。
shnpm i express-generator -g # 全局安装
基本使用:
以创建名为 my-express-app 的项目为例,步骤如下:
创建项目:执行以下命令,生成项目结构:
shexpress my-express-app # 1. 创建项目可选参数:
- --view 视图引擎:
默认:pug,指定模版引擎(如 ejs、pug、hbs)。 - -e:快速指定 ejs 模板引擎(等同于
--view=ejs)。 - --git:自动生成
.gitignore文件。
- --view 视图引擎:
项目目录结构:
sh├── app.js ├── bin │ └── www ├── package-lock.json ├── package.json ├── public │ ├── images │ ├── javascripts │ └── stylesheets │ └── style.css ├── routes │ ├── index.js │ └── users.js └── views ├── error.jade ├── index.jade └── layout.jade安装项目依赖并启动项目:
shnpm i # 1. 安装项目依赖 npm start # 启动项目访问项目:
打开浏览器访问
http://localhost:3000,若看到 "Welcome to Express" 页面,则项目启动成功。
从零搭建
方式二:从零搭建
刚才创建的项目 express 项目,很多内容可能我们并不认识,所以刚开始我们最好从零来学习。
初始化新项目:
shnpm init -y安装 express:
需先安装 Node.js(建议 v14+),然后通过 npm 安装 express:
shnpm i express创建 Express 应用:见基本示例:
基本示例
我们来创建自己的第一个 express 程序:
const express = require('express')

// 创建服务器
const app = express()

// /home的get请求处理
app.get('/home', (req, res) => {
  res.end('Hello Home')
})

// /login的post请求处理
app.post('/login', (req, res) => {
  res.end('Hello Login')
})

// 开启监听
app.listen(8000, () => {
  console.log('服务器启动成功~')
})后续操作:分离请求
我们会发现,之后的开发过程中,可以方便的将请求进行分离。无论是不同的 url,还是 get、post 等请求方式。这样的方式非常方便维护、扩展;
中间件
认识中间件
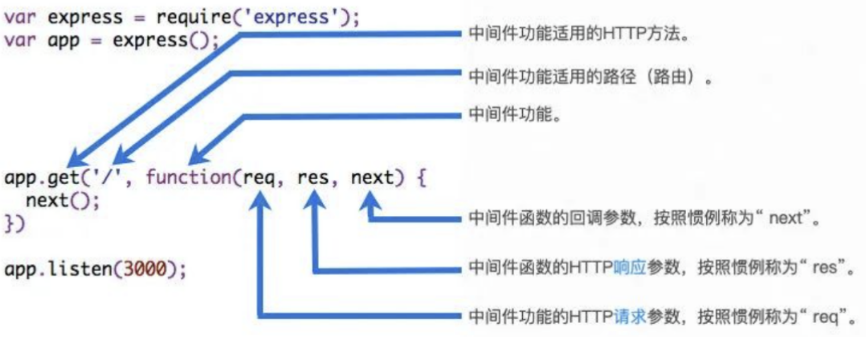
Express 是一个路由和中间件的 Web 框架,它本身的功能非常少:Express 应用程序本质上是一系列中间件函数的调用。
中间件(middleware):是一类处理请求的函数,能够访问请求对象(req)、响应对象(res)以及下一个中间件函数(next)。本质是传递给 express 的一个回调函数。
基本语法
普通中间件(3个参数)
jsfunction middleware(req, res, next) { // 1. 执行逻辑(如日志、验证、修改req/res等) // 2.1 调用 next() 传递控制权给下一个中间件/路由 next(); // 2.2 或调用 res.send() 等方法终止请求循环 // res.send() }错误处理中间件(4个参数)
jsfunction errorMiddleware(err, req, res, next) { // 处理错误(如打印日志、返回错误响应) console.error(err.stack); res.status(500).send('服务器出错了!'); }
参数解析
- req:
Request,请求对象。包含客户端信息,如参数、headers 等。 - res:
Response,响应对象。用于向客户端发送数据。 - next:
(err?)=>void,回调函数,调用后会将控制权传递给下一个中间件或路由处理函数;若不传,请求会被挂起(客户端一直等待响应)。 - err?:
Error,抛出的错误。
中间件的作用
- 执行逻辑(如日志记录、权限校验)
- 修改请求(request)和响应(response)对象
- 结束请求-响应周期(返回数据)
- 调用栈中的下一个中间件
示例:中间件的作用

执行下一个中间件
如果当前中间件功能没有结束请求-响应周期,则必须调用 next() 将控制权传递给下一个中间件或路由处理函数;若不传,请求会被挂起(客户端一直等待响应)。

注册中间件
中间件注册方式:
那么,如何将一个中间件注册到我们的应用程序中呢?express 主要提供了两种方式:
- app/router.use()
- app/router.[methods]()
注意:
- 可以是 app,也可以是 router,router 我们后续再学习。
- methods 指的是常用的请求方式,如 get、post、put 等。
我们先来学习 use 的用法,因为 methods 的方式本质是 use 的特殊情况;
普通中间件
语法:
// 通过 .use() 注册,不区分 path 和 methods
app.use((req, res, next?) => {})

// 或者
router.use((req, res, next?) => {})之所以称之为最普通的中间件,是因为无论是什么 path、methods 都会匹配该中间件;
const express = require('express')

const app = express()

app.use((req, res, next) => {
  console.log('common middleware 01')
  next() // 执行下一个中间件
})

app.use((req, res, next) => {
  console.log('common middleware 02')
  res.end('Hello Common Middleware~') // 返回结果,结束请求-响应周期
})

app.listen(8000, () => {
  console.log('中间件服务器启动成功~')
})中间件的执行顺序:在匹配上的情况下,中间件按照注册的顺序执行;
path 匹配中间件
通过 app.use(path, middleware) 为中间件指定路径前缀,仅当请求路径匹配该 path 前缀时才执行:
// 仅对 /home 开头的请求生效(如 /home/users、/home/posts)
app.use('/home', (req, res, next) => {
  console.log('home middleware 01')
  next()
})

app.use('/home', (req, res, next) => {
  console.log('home middleware 02')
  next()
  res.end('Hello Home middleware')
})

app.use((req, res, next) => {
  console.log('common middleware')
})path 和 method 匹配中间件
当请求路径同时匹配 path 和 method 时执行该中间件:
// 案例三: method匹配中间件
app.get('/home', (req, res, next) => {
  console.log('home get middleware')
  next()
})

app.post('/login', (req, res, next) => {
  console.log('login post middleware')
  next()
})

app.use((req, res, next) => {
  console.log('common middleware')
})注册多个中间件
一个路径可绑定多个中间件,按定义顺序执行,通过 next() 传递控制权:
// 案例四: 注册多个中间件
const homeMiddleware1 = (req, res, next) => {
  console.log('home middleware 01')
  next()
}

const homeMiddleware2 = (req, res, next) => {
  console.log('home middleware 02')
  next()
}

const homeHandle = (req, res, next) => {
  res.end('Hello Home~')
}

app.get('/home', homeMiddleware1, homeMiddleware2, homeHandle)中间件执行流程
中间件执行流程:
Express 中间件按定义顺序执行,整个请求 - 响应流程如下:
- 客户端发送请求到服务器。
- 请求进入第一个中间件,执行逻辑后调用
next()传递给下一个中间件。 - 依次经过后续中间件,直到匹配到路由处理函数。
- 路由处理函数执行并通过
res.send()等方法发送响应,终止请求循环。 - 若过程中抛出错误(同步
throw或异步next(err)),则跳过后续中间件,直接执行错误处理中间件。
示例:执行顺序演示
const express = require('express');
const app = express();

// 中间件1
app.use((req, res, next) => {
  console.log('中间件1 执行');
  next();
});

// 中间件2
app.use((req, res, next) => {
  console.log('中间件2 执行');
  next(); // 传递给路由
});

// 路由处理函数
app.get('/', (req, res) => {
  console.log('路由处理函数执行');
  res.send('响应客户端'); // 终止请求循环
});

// 中间件3(路由已终止请求,不会执行)
app.use((req, res, next) => {
  console.log('中间件3 执行'); // 不会被打印
  next();
});

// 错误处理中间件(无错误时不执行)
app.use((err, req, res, next) => {
  console.log('错误处理中间件执行');
});

// 输出顺序:中间件1 执行 → 中间件2 执行 → 路由处理函数执行内置中间件
并非所有的中间件都需要我们从零去编写:
- express 有内置一些帮助我们完成对 request 解析的中间件;
- registry 仓库中也有很多可以辅助我们开发的中间件;
在客户端发送 post 请求时,会将数据放到 body 中:
- 客户端可以通过 json 的方式传递;
- 也可以通过 form 表单的方式传递;
express 内置了解析以上2种参数类型的中间件:
解析 json 参数中间件
前端发送用户登录请求(携带 json 参数):
我们这里先使用 json 传递给服务器 body:

后端解析:
方式一:手动解析:
不进行解析时的操作:
jsapp.post('/login', (req, res, next) => { req.on('data', (data) => { console.log(data.toString()) }) req.on('end', () => { res.end('登录成功~') }) })我们也可以自己编写中间件来解析 JSON:
js// 解析 json 的普通中间件 app.use((req, res, next) => { if (req.headers['content-type'] === 'application/json') { req.on('data', (data) => { const userInfo = JSON.parse(data.toString()) req.body = userInfo }) req.on('end', () => { next() }) } else { next() } }) app.post('/login', (req, res, next) => { console.log(req.body) res.end('登录成功~') })方式二:
body-parser中间件解析:事实上我们可以使用 expres 内置的中间件或者使用
body-parser来完成:jsapp.use(express.json()) app.post('/login', (req, res, next) => { console.log(req.body) res.end('登录成功~') })
解析 form 参数中间件
前端发送用户登录请求(携带 form 参数):
如果我们解析的是
application/x-www-form-urlencoded:
后端解析:
urlencoded中间件解析:后端可以使用 express 自带的 expresss.urlencoded() 函数来作为中间件:
- 传入的 extended 用于表示使用哪一种解析方式:
- true:使用 qs 第三方模块;
- false:使用 querystring 内置模块;
- 备注:它们之间的区别这里不展开讲解;
jsapp.use(express.json()) app.use(express.urlencoded({ extended: true })) app.post('/login', (req, res, next) => { console.log(req.body) res.end('登录成功~') })- 传入的 extended 用于表示使用哪一种解析方式:
第三方中间件
morgan 请求日志记录
API-morgan
General:
- morgan():
(format, options?),用于创建一个 HTTP 请求日志中间件,并根据传入的参数配置日志格式、输出方式等行为。
介绍 morgan
如果我们希望将请求日志记录下来,那么可以使用 express 官网开发的第三方库:morgan。
依赖安装:
morgan:记录请求日志到指定文件中。
shnpm i morgon
基本示例
1、直接作为中间件使用即可:
const loggerWriter = fs.createWriteStream('./log/access.log', { flags: 'a+' })
app.use(morgan('combined', { stream: loggerWriter }))2、日志内容:

multer 文件上传@
文件上传我们可以使用 express 官方开发的第三方库:multer。
依赖安装:
multer:解析上传的文件。
shnpm i multer
单文件上传
单文件上传:
前端上传文件:
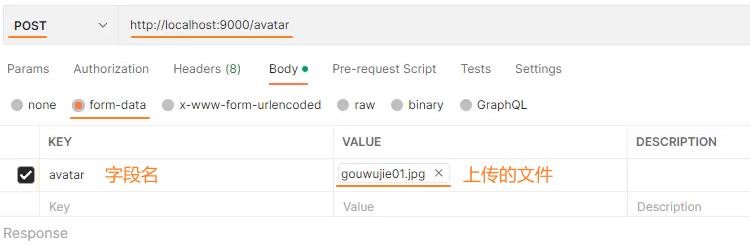
后端使用
upload.single()解析上传的文件:只指定文件存储路径:
通过 multer({dest}) 指定文件存储路径,并且随机文件名:
js// 1. 调用 multer() 方法,创建 upload 对象 const upload = multer({ dest: 'uploads/' }) // 2. 在路由中应用 upload.single() 中间件,解析上传的单个文件 app.post('/upload', upload.single('avatar'), (req, res, next) => { // 3. 通过 req.file 获取上传的文件 console.log(req.file.buffer) res.end('文件上传成功~') })自定义文件存储路径和文件名:
通过 multer.diskStorage({destination, filename}) 支持自定义文件名、存储路径:
jsconst storage = multer.diskStorage({ // 1. 自定义存储目录 destination: (req, file, cb) => { cb(null, 'uploads/') }, // 2. 自定义文件名 filename: (req, file, cb) => { cb(null, Date.now() + path.extname(file.originalname)) } }) const upload = multer({ // 3. 使用自定义 storage storage: storage }) app.post('/upload', upload.single('avatar'), (req, res, next) => { console.log(req.file.buffer) res.end('文件上传成功~') })req.file对象: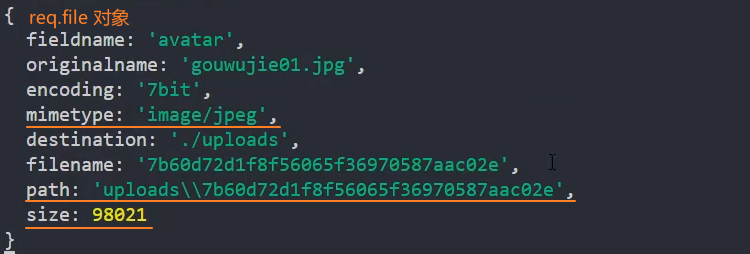
多文件上传(同一字段)
多文件上传(同一字段):
前端上传多文件(同一字段):

后端使用
upload.array()解析上传的文件:只解析文件:使用 upload.array() 处理上传多张图片
jsapp.use('/upload', upload.array('photos'), (req, res, next) => { console.log(req.files) })req.files对象:
form-data 解析
form-data 解析:
前端发送 form-data 数据:
不推荐通过 form-data 发送数据,推荐 json

后端使用
upload.any()解析:注意:
通过 form-data 发送的数据,在后端无法使用 express.json() 和 express.urlencoded() 解析
使用 upload.any() 解析文件的同时,还可以解析一些 form-data 中的普通数据。
使用 upload.any() 解析文件后,可以通过
req.files获取文件信息(数组形式)。不需要预先定义要处理的字段名,因此适用于字段名动态变化的场景。
js// 1. 返回 upload 对象 const upload = multer() // 2. 通过 upload.any() 返回解析 form-data 数据的中间件 app.use('/login', upload.any(), (req, res, next) => { // 3. 通过 req.body 获取解析后的 form-data 数据 console.log(req.body) // 4. 通过 req.files 获取上传的文件信息 })req.body对象:
req.files数组: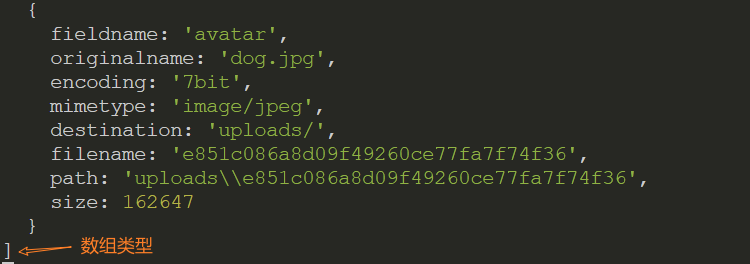
请求/响应
请求参数解析
请求参数类型:客户端传递到服务器参数的方法常见的是 5 种:
- 方式一:通过 get 请求中的 URL 的 params;
- 方式二:通过 get 请求中的 URL 的 query;
- 方式三:通过 post 请求中的 body 的 json 格式(中间件中已经使用过);
- 方式四:通过 post 请求中的 body 的 x-www-form-urlencoded 格式(中间件使用过);
- 方式五:通过 post 请求中的 form-data 格式(中间件中使用过);
GET 发送 params
方式一:GET 发送 params:
请求地址:http://localhost:8000/login/abc/why
获取参数:req.params
示例:解析 GET 发送 params
前端发送请求:
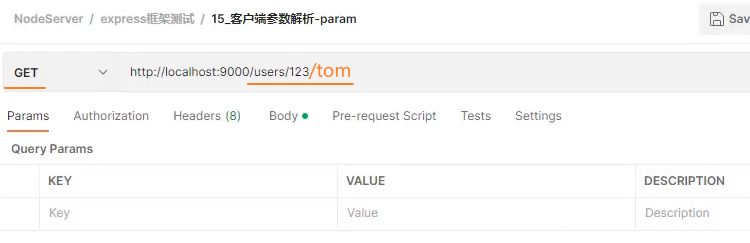
后端解析:通过
req.params解析。jsapp.use('/users/:id/:name', (req, res, next) => { console.log(req.params) res.json('请求成功~') })
GET 发送 query
方式二:GET 发送 query:
请求地址:http://localhost:8000/login?username=why&password=123
获取参数:req.query
示例:解析 GET 发送 query
前端发送请求:

后端解析:通过
req.query解析。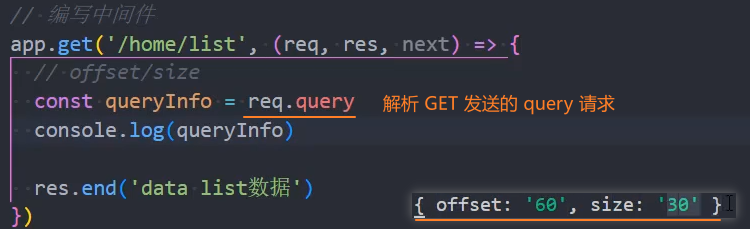
POST 发送 JSON
POST 发送 x-www-form-urlencoded
POST 发送 form-data
响应方法
res.end()
res.end():(),用于结束当前响应流程,告知客户端响应已完成并发送最后的数据。
res.end():
(),无参数,仅结束响应。res.end():
(data),发送数据后结束响应。res.end():
(data, encoding),指定编码格式发送数据后结束响应。data?:
string|buffer,要发送给客户端的最后数据。encoding?:
string,默认:utf8,当data为字符串时,指定其编码格式(如'utf8'、'base64'等)。若data为 Buffer,此参数会被忽略。
返回:
res:
Response,返回当前的响应对象(res 本身),支持链式调用(不常用)。
示例:
无参数:仅结束响应(客户端收到空响应):
jsif (req.url === '/empty') { res.end(); return; }带字符串数据:发送文本后结束响应:
jsif (req.url === '/text') { res.end('Hello, World!'); // 等价于 res.end('Hello, World!', 'utf8') return; }带 Buffer 和编码:发送二进制数据后结束响应:
jsif (req.url === '/buffer') { const buffer = Buffer.from('Binary data', 'utf8'); res.end(buffer); // encoding 被忽略(因 data 是 Buffer) return; }
核心特性:
必须调用
end()终止响应:无论是否发送数据,都必须调用
res.end()来终止响应,否则客户端会一直等待(超时后报错)。数据大小限制:
res.end()适合发送少量 “收尾数据”,若需发送大量数据,应使用res.write()分块发送,最后用res.end()结束。调用时机:
res.end()是响应的 “最后一步”,调用后不能再对响应进行任何操作,否则会抛出错误。
res.json()
res.json():(data),用于向客户端发送JSON 格式的响应。
data:
object|array|string|...,支持多种类型,要发送给客户端的最后数据。返回:
res:
Response,返回当前的响应对象(res 本身),支持链式调用。
示例:
链式调用(设置状态码后发送 JSON):
jsapp.get('/error', (req, res) => { // 先设置 404 状态码,再发送错误信息 JSON res.status(404).json({ code: 404, message: '资源不存在' }); });
核心特性:
data 参数支持的数据类型:
data支持多种数据类型,Express 会自动将其序列化为 JSON 字符串:参数类型 说明 序列化规则示例 Object普通对象(键值对) { name: '张三', age: 20 }→{"name":"张三","age":20}Array数组 [1, 2, 'a']→[1,2,"a"]String字符串 "hello"→"hello"(JSON 字符串格式,带双引号)Number数字(整数、浮点数、NaN、Infinity) 42→42;NaN→null;Infinity→null(JSON 规范不支持 NaN/Infinity)Boolean布尔值 true→true;false→falsenull空值 null→nullDate日期对象 new Date('2023-01-01')→"2023-01-01T00:00:00.000Z"(ISO 字符串)Buffer二进制缓冲区对象 转为 base64 字符串,如 Buffer.from('test')→"dGVzdA=="其他特殊对象 如 Map、Set等(需实现toJSON()方法,否则默认序列化结果可能不符合预期)new Map([['a', 1]])→{}(默认无toJSON()方法,需手动处理)jsconst express = require('express'); const app = express(); // 1. 发送对象 app.get('/user', (req, res) => { res.json({ name: '张三', age: 20, isStudent: false }); }); // 2. 发送数组 app.get('/list', (req, res) => { res.json(['苹果', '香蕉', '橙子']); }); // 3. 发送特殊值 app.get('/special', (req, res) => { res.json({ date: new Date('2023-01-01'), // "2023-01-01T00:00:00.000Z" buffer: Buffer.from('hello'), // "aGVsbG8=" nan: NaN, // null infinity: Infinity, // null nullVal: null // null }); }); app.listen(3000);对比
res.send():res.send()也可以发送 JSON 数据(当传入对象 / 数组时),但res.json()更明确且有以下差异:Content-Type 优先级:
res.json()会强制将响应头Content-Type设置为application/json,即使之前通过res.set()手动设置了其他类型。而
res.send()会根据数据类型自动推断(如对象 / 数组设为application/json,字符串设为text/html)。
对非对象类型的处理:
res.json('hello')会发送 JSON 字符串(带引号:"hello")。- 而
res.send('hello')会发送纯文本(不带引号:hello)。
js// res.json() 发送字符串 → JSON 格式 app.get('/json-str', (req, res) => { res.json('hello'); // 响应:"hello"(Content-Type: application/json) }); // res.send() 发送字符串 → 纯文本格式 app.get('/send-str', (req, res) => { res.send('hello'); // 响应:hello(Content-Type: text/html; charset=utf-8) });JSON 序列化限制:
res.json()内部使用JSON.stringify()进行序列化,因此受限于 JSON 规范:- 不支持循环引用(如
const a = {}; a.self = a; res.json(a)会抛出错误)。 - 不支持
Function、Symbol类型(会被忽略或转为null)。 NaN、Infinity会被转为null(如示例中所示)。
- 不支持循环引用(如
res.status()
res.status():(code),用于设置 HTTP 响应的状态码。常与 res.send()、res.json() 等方法配合使用。
code:
number,表示 HTTP 响应状态码。其值必须符合 HTTP 协议规范,有效范围为 100-599。返回:
res:
Response,返回当前的响应对象(res 本身),支持链式调用。
示例:
成功响应(200/201):
js// 200(OK):请求成功 app.get('/success', (req, res) => { res.status(200).send('请求成功'); // 链式调用:设置状态码后发送文本 }); // 201(Created):资源创建成功 app.post('/user', (req, res) => { res.status(201).json({ message: '用户创建成功', id: 123 }); // 发送 JSON 响应 });客户端错误(400/404):
js// 400(Bad Request):请求参数错误 app.post('/login', (req, res) => { if (!req.body.username) { res.status(400).json({ error: '用户名不能为空' }); } }); // 404(Not Found):资源不存在 app.get('/nonexistent', (req, res) => { res.status(404).send('<h1>页面不存在</h1>'); // 发送 HTML 响应 });服务器错误(500):
js// 500(Internal Server Error):服务器内部错误 app.get('/error', (req, res) => { try { // 模拟错误 throw new Error('数据库连接失败'); } catch (err) { res.status(500).json({ error: '服务器内部错误', details: err.message }); } });重定向(301/302):
js// 301(Moved Permanently):永久重定向 app.get('/old-path', (req, res) => { res.status(301).redirect('/new-path'); // 结合 redirect() 方法 }); // 302(Found):临时重定向(Express 中 redirect() 默认使用 302) app.get('/temp', (req, res) => { res.status(302).redirect('/temp-new'); });
核心特性:
对比
res.sendStatus():res.status(code):仅设置状态码,不发送响应内容,需配合send()、json()等方法发送数据;res.sendStatus(code):设置状态码的同时,自动发送该状态码对应的默认描述文本(如res.sendStatus(404)等价于res.status(404).send('Not Found'))。
js// res.status() + send():自定义响应内容 res.status(404).send('自定义:页面不见了'); // res.sendStatus():使用默认描述 res.sendStatus(404); // 响应体为 'Not Found'(默认文本)状态码的默认值:
若未通过
res.status()显式设置状态码,Express 会根据响应类型自动使用默认值:- 成功响应(如
res.send('ok'))默认状态码为 200; - 重定向(
res.redirect())默认状态码为 302; - 错误响应(如未捕获的异常)可能默认使用 500。
- 成功响应(如
路由
介绍路由
路由(Routing):用于定义客户端请求的 URL 路径 与 服务器处理逻辑 之间的映射关系。
基本语法:
// app 级路由
app.METHOD(PATH, HANDLER)

// router 级路由
router.METHOD(PATH, HANDLER)app:Express 应用实例(通过express()创建)。router:Router 实例(通过express.Router()创建)。METHOD:HTTP 请求方法(如get、post、put、delete等),需用小写形式。PATH:客户端请求的 URL 路径(可以是字符串、字符串模式或正则表达式)。HANDLER:当路由匹配时执行的处理函数(中间件),格式为(req, res, next) => {},其中:req:请求对象(包含客户端发送的信息,如参数、 headers 等)。res:响应对象(用于向客户端返回数据)。next:用于调用下一个中间件或路由处理函数的回调函数。
Router 路由
如果我们将所有的代码逻辑都写在 app 中,那么 app 会变得越来越复杂:
一方面完整的 Web 服务器包含非常多的处理逻辑;
另一方面有些处理逻辑其实是一个整体,我们应该将它们放在一起,比如对 users 相关的处理:
- 获取用户列表
- 获取某一个用户信息
- 创建一个新的用户
- 删除一个用户
- 更新一个用户
我们可以使用 express.Router() 来创建一个路由处理程序:
- 一个 Router 实例拥有完整的中间件和路由系统;
- 因此,它也被称为
迷你应用程序(mini-app);
路由的基本使用:
// 1. 创建路由对象
const userRouter = express.Router()

// 2. 路由接口映射
// GET 路由(获取资源)
userRouter.get('/', (req, res, next) => {
  res.end('用户列表')
})

// POST 路由(创建资源)
userRouter.post('/', (req, res, next) => {
  res.end('创建用户')
})

// UT 路由(更新资源)
userRouter.put('/:id', (req, res) => {
  const userId = req.params.id; // 获取动态参数 id
  const updatedData = req.body; // 获取更新的数据
  res.json({ message: `用户 ${userId} 全量更新成功`, data: updatedData });
});

// DELETE 路由(删除资源)
userRouter.delete('/:id', (req, res, next) => {
  res.end('删除用户', req.params.id)
})

// 3. 挂载路由
app.use('/users', userRouter)动态路由
当需要匹配动态变化的路径(如 /users/123、/posts/456)时,可使用路由参数(以 :参数名 定义)。路由参数的值会被存储在 req.params 对象中。
基本用法
// 路径为 "/users/:id",:id 是动态参数
app.get('/users/:id', (req, res) => {

  // req.params 是一个对象,键为参数名,值为客户端传入的参数
  console.log(req.params); // 若访问 /users/123,输出 { id: '123' }

  res.send(`访问的用户 ID 是:${req.params.id}`);
});多个参数
路由可以包含多个动态参数,参数名需唯一:
// 路径为 "/users/:userId/posts/:postId"
app.get('/users/:userId/posts/:postId', (req, res) => {

  const { userId, postId } = req.params;
  res.send(`用户 ${userId} 的文章 ${postId}`);
});

// 访问 /users/1/posts/100 → 输出 "用户 1 的文章 100"可选参数
通过在参数名后加 ?,可将参数设为可选(即该参数可传可不传):
// 路径为 "/search/:keyword?",:keyword 是可选参数
app.get('/search/:keyword?', (req, res) => {

  const keyword = req.params.keyword || '默认关键词';

  res.send(`搜索关键词:${keyword}`);
});

// 访问 /search → 输出 "搜索关键词:默认关键词"
// 访问 /search/express → 输出 "搜索关键词:express"正则表达式约束参数格式
express@5 版本变化:
从 Express 5.0 开始,框架移除了对在路径字符串中直接使用这类正则元字符(包括 *、?、+等)的支持。
解决方案:直接使用 RegExp 对象,如 app.get(/^\/users\/:id$/),但是不能直接在路径部分约束 :id 的类型了,只能在其他地方限制,如 //.test(req.params.id)。
通过正则表达式,可以限制参数的格式(如仅允许数字、特定长度等):
// 仅匹配参数为数字的路径(\d+ 表示一个或多个数字)
app.get('/users/:id(\\d+)', (req, res) => {
  res.send(`用户 ID(数字):${req.params.id}`);
});

// 访问 /users/123 → 匹配成功
// 访问 /users/abc → 匹配失败(会交给后续路由或返回 404)路由封装
路由封装到单独文件:
在
userRouter.js中封装路由逻辑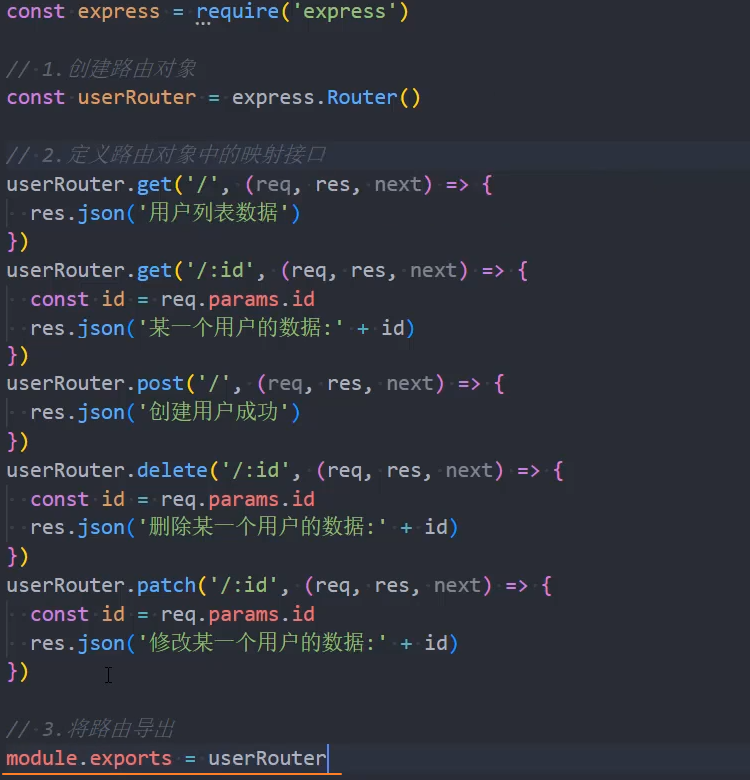
在
app.js中导入并挂载 userRouter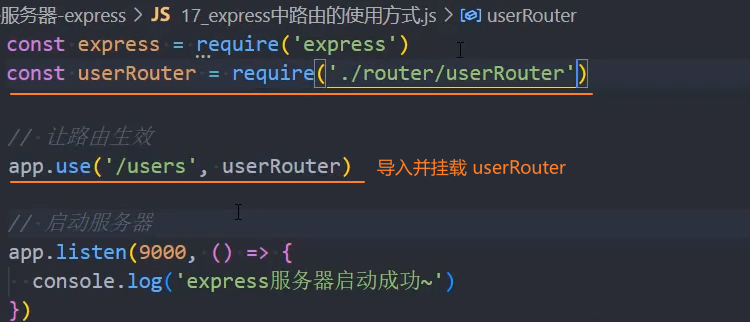
静态资源服务器
部署静态资源
部署静态资源我们可以选择很多方式:
Node 也可以作为静态资源服务器,并且 express 给我们提供了方便部署静态资源的方法。
express 部署打包后的项目为静态资源:
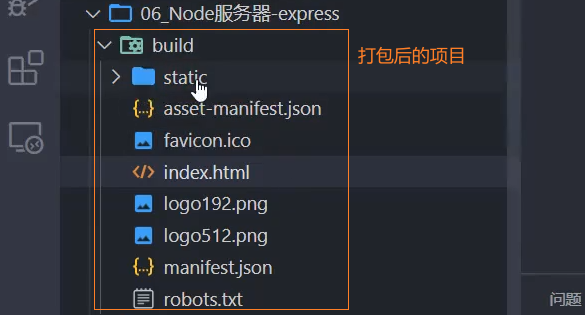
const express = require('express')

const app = express()

// build 目录存放的是打包后的项目
// 内置的中间件:直接将一个目录作为静态资源
app.use(express.static('./build'))

app.listen(8000, () => {
  console.log('静态服务器启动成功~')
})错误处理
Express 的错误处理主要依赖错误处理中间件,并针对同步代码、异步代码(回调、Promise、async/await)提供了不同的错误捕获方式。
错误处理中间件
Express 中,错误处理的核心是错误处理中间件。与普通中间件不同,它必须接收4 个参数(err, req, res, next),即使不需要使用 next,也必须声明该参数,否则 Express 会将其视为普通中间件,无法捕获错误。
基本语法:
app.use((err, req, res, next) => {
  // 1. 处理错误(如打印日志、记录到数据库等)
  console.error('错误信息:', err.message);

  // 2. 向客户端返回错误响应
  res.status(err.statusCode || 500)
     .json({error: err.message || '服务器内部错误'});
});错误响应的方案:
通过
status()返回错误对应的 HTTP 状态码:jsres.status(err.statusCode || 500).json({error: err.message || '服务器内部错误'});状态码始终返回200,通过
json()返回自定义的错误类型:jsres.json({ code: 1001, message: '自定义的错误' });
关键特性:
集中式处理:
所有错误最终都会流转到错误处理中间件,避免在每个路由中重复编写错误处理逻辑。
位置要求:
必须放在所有路由和普通中间件之后,否则无法捕获后续代码抛出的错误。
错误传递:
错误通过
next(err)方法传递给错误处理中间件(同步错误和async/await错误会被 Express 自动捕获并传递)。
错误捕获
Express 中错误分为同步错误和异步错误,两者的捕获方式不同。
同步错误捕获
同步代码中(如直接执行的逻辑、无回调的代码),通过 throw 抛出的错误会被 Express 自动捕获,并传递给错误处理中间件。
// 同步路由逻辑
app.get('/sync-error', (req, res) => {
  // 1. 同步错误:直接 throw
  if (!req.query.id) {
    throw new Error('缺少 id 参数'); // Express 自动捕获并传递给错误处理中间件
  }
  res.send('成功');
});

// 2. 错误处理中间件(放在最后)
app.use((err, req, res, next) => {
  res.status(400).send({ error: err.message }); // 响应:{ error: '缺少 id 参数' }
});异步错误捕获
异步代码(如回调函数、Promise、定时器、数据库操作等)中,错误不会被 Express 自动捕获,必须手动通过 next(err) 传递给错误处理中间件。
回调函数中的错误
对于基于回调的异步操作(如 fs.readFile),需在回调中捕获错误并调用 next(err)。
const fs = require('fs');

app.get('/read-file', (req, res, next) => {
  // 异步操作:读取文件(回调形式)
  fs.readFile('nonexistent.txt', (err, data) => {
    if (err) {
      // 1. 手动传递错误给错误处理中间件
      return next(err); // 2. 关键:必须用 return 终止后续逻辑
    }
    res.send(data.toString());
  });
});

// 3. 错误处理中间件
app.use((err, req, res, next) => {
  console.error('文件读取错误:', err.message);
  res.status(500).send({ error: '文件读取失败' });
});Promise 中的错误
对于返回 Promise 的异步操作(如 fetch、Mongoose 数据库操作),需通过 .catch() 捕获错误并传递给 next。
// 模拟一个返回 Promise 的异步操作
const fetchData = () => {
  return new Promise((resolve, reject) => {
    setTimeout(() => {
      // 1. 出现异步错误:Promise reject
      reject(new Error('数据获取失败'));
    }, 1000);
  });
};

app.get('/promise-error', (req, res, next) => {
  fetchData()
    .then(data => res.send(data))
    .catch(err => {
      next(err); // 2. 捕获 reject 错误,传递给错误处理中间件
    });
});async/await 中的错误
async/await 是 Promise 的语法糖,异步错误需通过 try/catch 捕获,再用 next(err) 传递。
app.get('/async-await-error', async (req, res, next) => {
  try {
    // 模拟异步操作(await 后面跟 Promise)
    const data = await fetchData(); // fetchData 是前面定义的 Promise 函数
    res.send(data);
  } catch (err) {
    // 捕获 await 抛出的错误(即 Promise reject)
    next(err); // 传递给错误处理中间件
  }
});简化写法:
由于 async 函数返回的 Promise 若 reject,Express 会自动将错误传递给错误处理中间件,因此可省略 try/catch,直接让错误 “冒泡”:
app.get('/async-await-error', async (req, res) => {
  // 若 fetchData  reject,async 函数会返回 rejected Promise,Express 自动捕获
  const data = await fetchData();
  res.send(data);
});源码
debug 源码流程
express
express()
1、创建 app

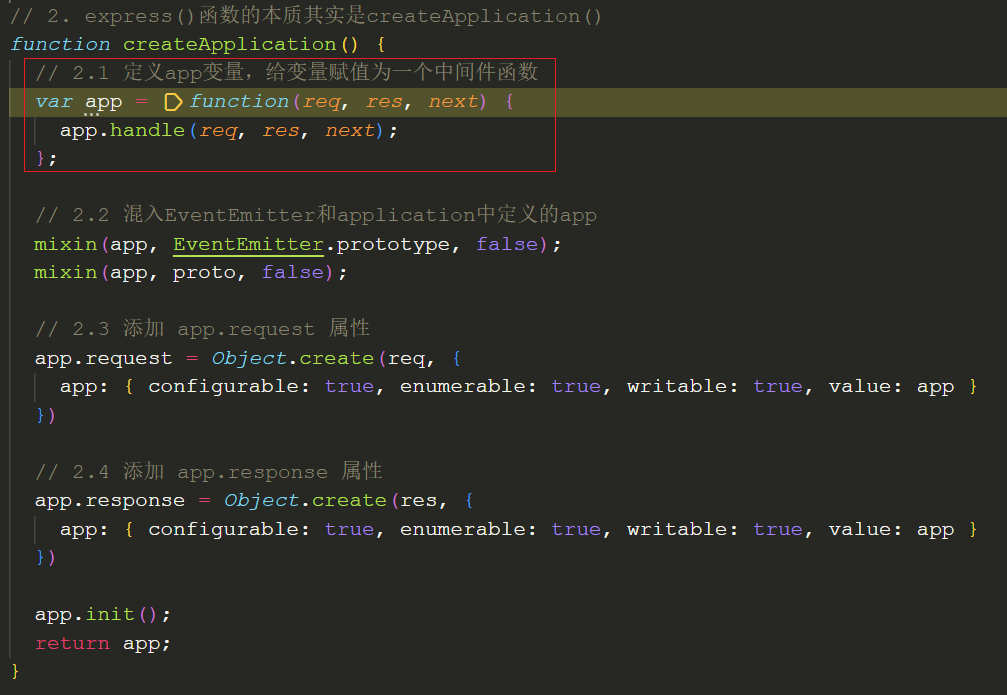
2、express()函数的本质其实是createApplication(),返回一个 app 函数对象
app.listen()
1、调用app.listen()
2、在createApplication()中通过mixin()将 app 进行了混入

3、app.listen()本质上是对http.createServer(this)的封装,此处的 this 指向 app

app.use()
1、注册中间件
1、通过 use 来注册一个中间件
// 注册普通中间件
+++ app.use(
  (req, res, next) => {
    console.log('普通中间件1')
    next()
  },
  (req, res, next) => {
    console.log('普通中间件2')
    next()
  }
)2、无论是 app.use 还是 app.methods 都会注册一个主路由, app 本质上会将所有的函数,交给这个主路由去处理
// application.js

// 2. 实现use()
app.use = function use(fn) {
  // 初始化变量
  var offset = 0;
  var path = '/';

  // default path to '/'
  // disambiguate app.use([fn])
  // 参数fn可以是function也可以是path + function
  if (typeof fn !== 'function') {
    var arg = fn;

    // 取出参数列表中的第一个参数,此时它是path
    while (Array.isArray(arg) && arg.length !== 0) {
      arg = arg[0];
    }

    // first arg is the path
    // 获取到path
    if (typeof arg !== 'function') {
      offset = 1;
      path = fn;
    }
  }

  var fns = flatten(slice.call(arguments, offset));

  if (fns.length === 0) {
    throw new TypeError('app.use() requires a middleware function')
  }

  // setup router
  // 路由器懒加载
  this.lazyrouter();
  var router = this._router;

  // 遍历中间件函数
  fns.forEach(function (fn) {
    // non-express app
    // 非Express应用中间件,直接使用router.use(path, fn)将其注册到指定的路径
    if (!fn || !fn.handle || !fn.set) {
      return router.use(path, fn);
    }

    debug('.use app under %s', path);
    fn.mountpath = path;
    fn.parent = this;

    // restore .app property on req and res
    // 创建一个新的中间件函数
    router.use(path, function mounted_app(req, res, next) {
      var orig = req.app;
      fn.handle(req, res, function (err) {
        setPrototypeOf(req, orig.request)
        setPrototypeOf(res, orig.response)
        next(err);
      });
    });

    // mounted an app
    fn.emit('mount', this);
  }, this);

  return this;
};3、在主路由router.use(path, fn)中,一个函数 fn 会创建一个 layer,并被放入到 router.stack 中
proto.use = function use(fn) {
  var offset = 0;
  var path = '/';

  // default path to '/'
  // disambiguate router.use([fn])
  if (typeof fn !== 'function') {
    var arg = fn;

    while (Array.isArray(arg) && arg.length !== 0) {
      arg = arg[0];
    }

    // first arg is the path
    if (typeof arg !== 'function') {
      offset = 1;
      path = fn;
    }
  }

  var callbacks = flatten(slice.call(arguments, offset));

  if (callbacks.length === 0) {
    throw new TypeError('Router.use() requires a middleware function')
  }

  for (var i = 0; i < callbacks.length; i++) {
    var fn = callbacks[i];

    if (typeof fn !== 'function') {
      throw new TypeError('Router.use() requires a middleware function but got a ' + gettype(fn))
    }

    // add the middleware
    debug('use %o %s', path, fn.name || '<anonymous>')

+++    var layer = new Layer(path, {
      sensitive: this.caseSensitive,
      strict: false,
      end: false
    }, fn);

    layer.route = undefined;
	// this指向router,所以fns也是保存在router.stack中
+    this.stack.push(layer);
  }

  return this;
};4、在 Layer 中,会将 fn 赋值给layer.handle
function Layer(path, options, fn) {
  if (!(this instanceof Layer)) {
    return new Layer(path, options, fn);
  }

  debug('new %o', path)
  var opts = options || {};

+  this.handle = fn;
  this.name = fn.name || '<anonymous>';
  this.params = undefined;
  this.path = undefined;
  this.regexp = pathRegexp(path, this.keys = [], opts);

  // set fast path flags
  this.regexp.fast_star = path === '*'
  this.regexp.fast_slash = path === '/' && opts.end === false
}2、请求的处理过程
如果有一个请求过来,那么从哪里开始呢?
1、当请求过来时,会被app.listen监听并执行http.createServer(this)中的 this(app)
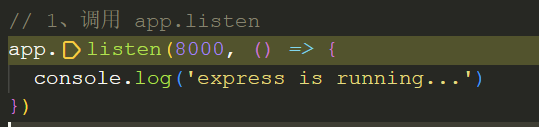
// 1、调用 app.listen
+++ app.listen(8000, () => {
  console.log('express is running...')
})// 2、调用 app.listen 的时候,本质上是调用 proto 中的 listen
app.listen = function listen() {
+++ var server = http.createServer(this);
return server.listen.apply(server, arguments);
};2、app 函数被调用开始的;
function createApplication() {
  // 2.1 定义app变量,给变量赋值为一个中间件函数
  var app = function(req, res, next) {
+++    app.handle(req, res, next);
  };
  // 省略
}3、app.handle 本质上会去调用 router.handle
app.handle = function handle(req, res, callback) {
  var router = this._router;

  // final handler
  var done = callback || finalhandler(req, res, {
    env: this.get('env'),
    onerror: logerror.bind(this)
  });

  // no routes
  if (!router) {
    debug('no routes defined on app');
    done();
    return;
  }

+++  router.handle(req, res, done);
};4、router.handle 中做的事:
- 取出 fns(layer):
var stack = self.stack - 执行 next:
next()- 遍历 fns(layer),匹配 path
- 当匹配到时,执行 fn(layer)
proto.handle = function handle(req, res, out) {
  var self = this;

  debug('dispatching %s %s', req.method, req.url);

  var idx = 0;
  var protohost = getProtohost(req.url) || ''
  var removed = '';
  var slashAdded = false;
  var sync = 0
  var paramcalled = {};

  // store options for OPTIONS request
  // only used if OPTIONS request
  var options = [];

  // middleware and routes
++  var stack = self.stack;

  // manage inter-router variables
  var parentParams = req.params;
  var parentUrl = req.baseUrl || '';
  var done = restore(out, req, 'baseUrl', 'next', 'params');

  // setup next layer
  req.next = next;

  // for options requests, respond with a default if nothing else responds
  if (req.method === 'OPTIONS') {
    done = wrap(done, function(old, err) {
      if (err || options.length === 0) return old(err);
      sendOptionsResponse(res, options, old);
    });
  }

  // setup basic req values
  req.baseUrl = parentUrl;
  req.originalUrl = req.originalUrl || req.url;

++  next();

  function next(err) {
    var layerError = err === 'route'
      ? null
      : err;

    // remove added slash
    if (slashAdded) {
      req.url = req.url.slice(1)
      slashAdded = false;
    }

    // restore altered req.url
    if (removed.length !== 0) {
      req.baseUrl = parentUrl;
      req.url = protohost + removed + req.url.slice(protohost.length)
      removed = '';
    }

    // signal to exit router
    if (layerError === 'router') {
      setImmediate(done, null)
      return
    }

    // no more matching layers
    if (idx >= stack.length) {
      setImmediate(done, layerError);
      return;
    }

    // max sync stack
    if (++sync > 100) {
      return setImmediate(next, err)
    }

    // get pathname of request
    var path = getPathname(req);

    if (path == null) {
      return done(layerError);
    }

    // find next matching layer
    var layer;
    var match;
    var route;

++    while (match !== true && idx < stack.length) {
      layer = stack[idx++];
      match = matchLayer(layer, path);
      route = layer.route;

      if (typeof match !== 'boolean') {
        // hold on to layerError
        layerError = layerError || match;
      }

      if (match !== true) {
        continue;
      }

      if (!route) {
        // process non-route handlers normally
        continue;
      }

      if (layerError) {
        // routes do not match with a pending error
        match = false;
        continue;
      }

      var method = req.method;
      var has_method = route._handles_method(method);

      // build up automatic options response
      if (!has_method && method === 'OPTIONS') {
        appendMethods(options, route._options());
      }

      // don't even bother matching route
      if (!has_method && method !== 'HEAD') {
        match = false;
      }
    }

    // no match
    if (match !== true) {
      return done(layerError);
    }

    // store route for dispatch on change
    if (route) {
      req.route = route;
    }

    // Capture one-time layer values
    req.params = self.mergeParams
      ? mergeParams(layer.params, parentParams)
      : layer.params;
    var layerPath = layer.path;

    // this should be done for the layer
    self.process_params(layer, paramcalled, req, res, function (err) {
      if (err) {
        next(layerError || err)
      } else if (route) {
++        layer.handle_request(req, res, next)
      } else {
        trim_prefix(layer, layerError, layerPath, path)
      }

      sync = 0
    });
  }

  function trim_prefix(layer, layerError, layerPath, path) {
	// 省略
  }
};